
What you will find here
Follow the archived Project Online walkthrough for creating enterprise custom fields through PWA settings.

Microsoft Project offers an extensive range of standardized fields, but sometimes it is necessary to add fields intended for project-specific information that are not natively contemplated on the platform, custom fields.
To create a field in Project Online, go to the gear that represents the Settings, located in the upper right corner. Select option PWA Settings.
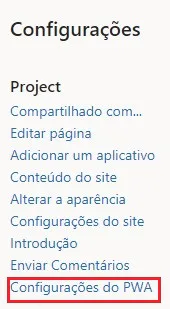
The menu will appear PWA Settings. Note that from here everything is very intuitive.
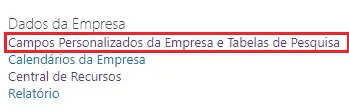
Go to Company Data > Company Custom Fields and Research Tables
Clicking on New Field, you will be taken to fill this, where you can set all necessary settings:

Name – Set the name that will be displayed. Note: If there is already a project native field with the same name, it will not be possible to save and it will be necessary to choose another name.
Description - Write a description for the custom field.
The next two fields deserve special attention. Entity and Type:
In Entity, set whether the field will be assigned to:
- Resources
- Tasks
- Projects
In Type, set if the field will be
- Cost
- Date
- Duration
- Number
- Signaler
- Text
It has been mentioned earlier that these fields deserve attention, and this is because they cannot be changed after the creation of the custom field.
Custom Attributes – Customize field attributes. That's four options:
- Text with a line
- Multiple line text
- Search Table
- Formula
Obs. In the next posts we will enter the details of Search Table and Formula, which require more attention.
Department– Here you associate the field with an existing department in your organization. If not filled, this field will be available on the server for all departments.
Values to be Shown - Set whether values will be displayed as Pure Data or Graphic Indicators. This last option offers a more friendly view. Below is an example of a conditional indicator:
Graphic indicators- What? This last option offers a more friendly view. Below is an example of a conditional indicator:
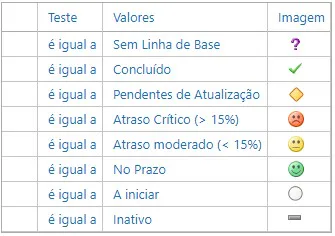
Behavior - Here you can define whether this field will be controlled by a workflow. Still in this field, in Require this field to have information, if you select Yeah., this field will be mandatory, so just dial Yeah. If it's really necessary.
After this, the field is fully filled and can be finished by clicking on Save.
To view this field and make changes, just return to PWA Settings > Company Custom Fields and Search Tables and locate the desired field.
These are all the fields that need to be filled out.
You still don't use MS Project in your company? Consult us about migration or deployment.
Original content from the MLPro editorial library, fully preserved and translated for the English website.