
What you will find here
Discover twelve Microsoft Planner features for organizing tasks, working in Teams, setting priorities and tracking everyday project work.
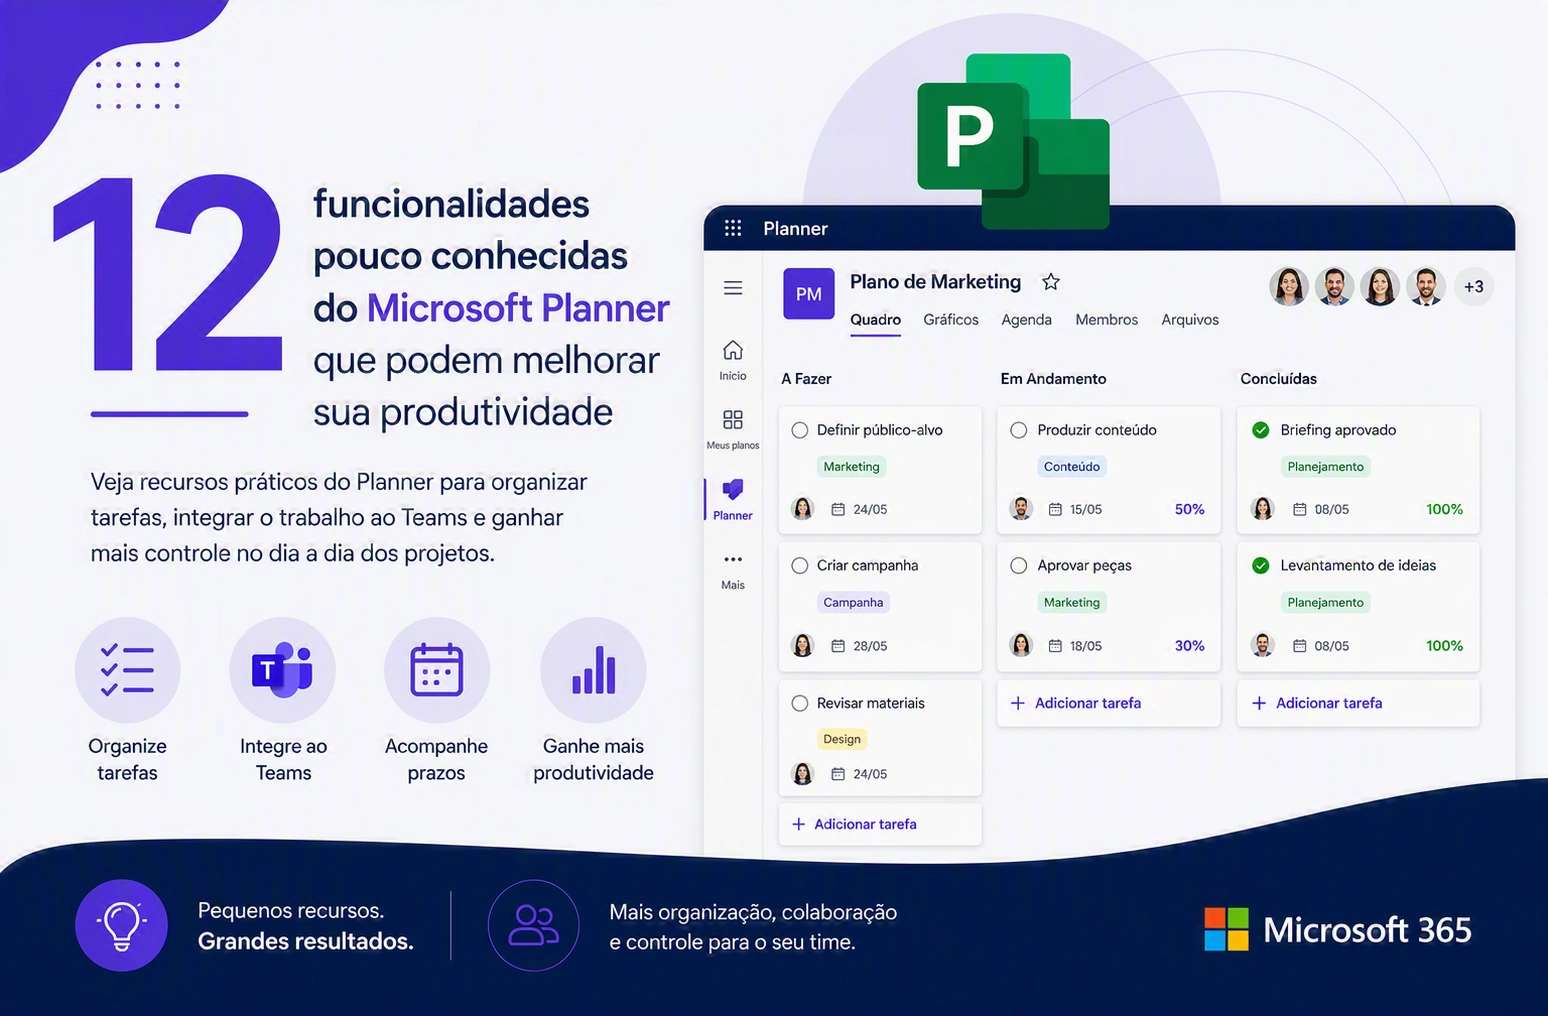
Microsoft Planner started as a simple tool for organizing tasks, but evolved significantly within the Microsoft 365. Today, it is deeply integrated with Microsoft Teams, Outlook and Power Platform, offering features that go far beyond the traditional task board that most teams use in everyday life.
In practice, it is common to find companies that have adopted the Planner only as a substitute for tracking spreadsheets or informal job lists. When this happens, much of the potential of the tool remains invisible to the team: visual organization resources, integration with Teams, centralized task management and visualizations that could reduce rework, forgetfulness and misalignments end up never being explored.
In this sense, we prepared this article to present features that are already available in the daily life of most users and that are still little used. They are features that usually go unnoticed because they are on secondary menus, depend on a different click or appear in scenarios that rarely enter the standard task management routine.
Throughout the text, each feature is presented with the context of use, step-by-step instructions and the expected result when it is applied. The intention is that, at the end of the reading, the project manager, the area leader or the end user can identify resources that can be immediately incorporated into their routine and start extracting more value from the Planner without relying on additional licenses, extensive training or complex environment restructuring.
If you prefer to see in practice, Leandro, CEO of MLPro also showed these video features on the MLPro channel. Watch:
12 little known features of Planner
 Play video: YouTube video player
1. Open and pin Planner in Microsoft Teams
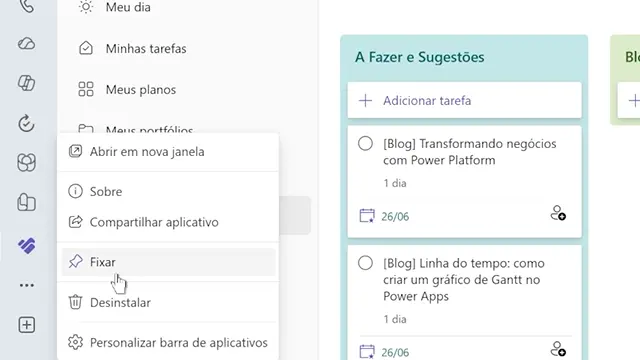
One of the first ways to gain productivity is to access the Planner directly by Microsoft Teams. Instead of switching between multiple windows, the user can add Planner to Teams and attach it to the sidebar, next to the Activity, Chat, Teams and Calendar icons.
This facilitates access to work plans, keeps tasks close to team conversations and dramatically reduces the chance of combined chat or meeting demands if they get lost between messages, notifications and emails. Teams that pin Planner in Teams even tend to update the task status more often because the tool is always one click away.
How to use
- Open Microsoft Teams by desktop application or web version.
- Click the “Apps” icon, represented by squares, at the bottom of the left sidebar.
- In the application panel search box, type “Planner” and wait for the results.
- Find the official Microsoft application called “Planner” and click “Add”.
- After installation, the Planner icon will appear in the Teams left sidebar.
- Right click on the Planner icon and select the “Fix” option.
- From now on, Planner will remain fixed in the sidebar and can be accessed with a single click without leaving Teams.
2. Pin favorite plans
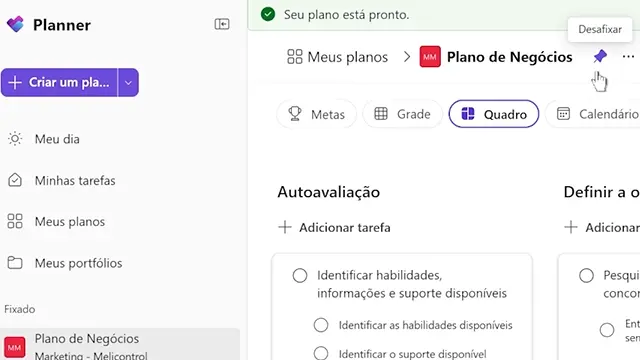
After creating or locating an important plan, it is possible to fix it so that it is always visible at the top of the side list of Planner. This feature is simple, but very useful for those accompanying various projects, work fronts, or simultaneous routines, situations where the list of plans usually grows rapidly.
With the plans fixed, the user reduces the time spent browsing the list and keeps the focus on the most relevant activities. For project managers, PMOs and area leaders participating in multiple plans simultaneously, this small change speeds up the switching between projects throughout the day and avoid unnecessary rhythm breaks.
How to use
- Open Microsoft Planner (via Teams or by the task address. office.com).
- In the left side menu, locate the plan you want to fix within the section “All plans”.
- Pass the mouse over the name of the plan until three points (context menu) appear to the right of the name.
- Click on the three points to open the plan options menu.
- Select “Fix” option (in some versions, appears as “Pin Plan”).
- The plan will be automatically moved to the “Standing” section, which is always visible at the top of the left side menu.
- To unfix a plan, repeat the process and select “Unfix”, the plan returns to the section “All plans”.
3. Create tasks from Teams messages
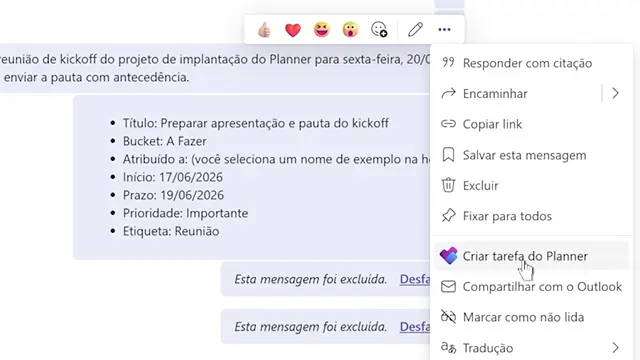
A very practical feature is to transform messages from Teams in tasks of Planner. When a demand arises during a chat conversation, it is possible to create a task directly from that message, set responsible, deadline and link it to the correct plan, all without leaving Teams.
This feature helps transform conversations into actions. Instead of relying on memory or parallel notes, the demand is already registered in the place where it will be accompanied. In addition, the task created maintains direct link back to the original message, which preserves the context and facilitates understanding later why that demand was created.
How to use
- In Microsoft Teams, open the chat or channel where is the message that describes the demand.
- Pass the mouse over the specific message until the quick action bar (with emojis and reactions) appears above it.
- In the action bar, click the three points (“More actions”) to expand the full menu.
- In the list that opens, search and select the option “Create Task”. If it does not appear immediately, use the “More apps” option to find it.
- A form will open, fill in the name of the task (the text of the message is already filled in automatically, but you can edit it).
- Choose the destination plan in the corresponding field. There will only be plans that you are a part of.
- Set the person responsible for the task, the deadline and (optional) apply a label for classification.
- Click “Create Task”. The demand will be registered in the chosen plan, with direct link back to Teams' original message.
4. Use labels strategically
Labels, also called labels, allow categorizing tasks by theme, area, priority or type of work. For example, a team can use tags to indicate IT activities, project management, support, client, internal improvement or any other classification relevant to your context.
This visual organization facilitates the reading of the picture and allows to quickly identify what kind of effort is concentrated on each plan. Real gain, however, only appears when the team defines a clear convention before going out applying: each color with a standardized meaning. Without this prior combination, the labels saw only colored decoration that no one can interpret. It is also worth remembering that the same task can receive multiple labels simultaneously, useful when it fits in more than one category.
How to use
- First of all, align with the team the meaning of each label color and document this convention in an accessible location (Wiki, SharePoint or the plan annotation card itself).
- Within the plan in Planner, click on any task to open its detail panel.
- In the side panel that opens to the right, locate the section “Labels” (near the top of the panel above the description).
- You will see the color tags available, click on each one you want to apply to the task. The selected ones will be marked.
- To rename a label and give it a name that makes sense to the team, click on the pencil icon next to the color and enter the new name (e.g. “urgent”, “external customer”, “backlog”).
- Close the task panel. The applied tags will appear as colored bars on the task card within the frame.
- Repeat the process in all relevant tasks, always following the defined agreement with the team.
5. Set dates by dragging tasks in the calendar
The calendar view of Planner is known by many users, but a valuable feature usually goes unnoticed: the possibility of setting and adjusting task dates directly dragging with the mouse within the calendar, without having to open each task individually to edit start and end times.
This transforms replanning into a visual and immediate action, just as one would in a traditional agenda. Reorganize a week or a whole month, which before took several clicks per task, is now done in seconds dragging bars in the calendar. This feature is particularly useful in weekly replanning routines or when the team needs to reorganize deliveries because of priority changes.
How to use
- Open the plan in Planner and find the view menu at the top of the screen (next to the plan name).
- Select the “Calendar” option to change the display to the agenda format.
- Choose the display mode that best suits your replanning: “Month” for broad view or “Week” for detail.
- To create a new task already with set dates, click on a calendar day and drag to the desired end day. A new task will be created with this interval already completed.
- To move an existing task to another date, click on the taskbar in the calendar and drag it to the new day.
- To stretch or reduce the period of a task, place the cursor on the right or left edge of the taskbar until the cursor turns into a resizing arrow, then drag to adjust.
- Changes are saved automatically. If you want to check, open the task to see the new start and end deadlines.
6. Update status in Board view
The Planner it also allows tracking tasks by status, such as “Not started”, “In progress” and “Completed”. This Kanban view is a simple and efficient way to understand work progress and replaces the organization with bucket with the logic of progress.
By moving tasks between status columns or updating the completion percentage, the team improves transparency and reduces doubts about what has already been done, what is running and what still needs to start. For the manager, this means faster follow-up meetings: instead of asking “how is X?” task by task, just look at the picture and see immediately where the bottlenecks are.
How to use
- Open the plan in Planner and keep (or select) the “Frame” view in the top menu.
- In the upper right corner of the frame, find the “Group by” button (in some versions appears as a drop-down menu).
- Click “Group by” and select “Progress” from the list that appears.
- The frame will be automatically reorganized, displaying three columns: “Not started”, “In progress” and “Completed”.
- To update the status of a task, click on it and drag it to the column corresponding to the new state.
- The status is automatically updated without opening the task. If you want, you can also click directly on the status icon within the task (the circle to the left of the name) and choose the new state.
- To return to the bucket view, repeat the process and choose “Bucket” under “Group by”.
7. Convert checklist items to tasks
Often a task starts with a simple checklist. However, during execution, some items can gain complexity and need responsibility, time frame, and self - monitoring, no longer being just an operational detail and requiring formal treatment.
In such cases, the Planner allows you to transform checklist items into complete tasks within the plan. This helps to “upgrade” the activity when it gains weight, without doubling information or losing the link with the mother task. It is especially useful in activities with multiple fronts or deliveries, when a subitem unexpectedly turns a work front itself.
How to use
- Open the task containing the checklist to be promoted by clicking on it within the Planner frame.
- In the side panel that opens, scrolls to the “Checklist” section (also called the checklist).
- Find the specific item of the checklist that needs to become a task.
- Pass the mouse over the item until an icon with three points appears to the right of it.
- Click on the three points and select “Promoting the Task” (or “Promoting to Task”).
- A new task will be created in the same bucket of the original task, with the text of the checklist item as a name.
- Open the new task and complete it with responsible, deadline, description, labels and other fields that make sense.
- The original item is removed from the parent task checklist, but context traceability remains, whoever consults the original task can understand that that item has become their own task.
8. Use My Day for daily focus
The “My Day” area is a personal and temporary list within the Planner, in which the user manually chooses the tasks he will focus on that day. Unlike the “My Tasks” vision, which shows all that is attributed to the user in all plans, “My Day” works as an intentional selection made at the beginning of the working hours.
At the end of the day, the list is automatically cleared, reinforcing the intentional and short-term character. On a daily basis, this helps the user to start each morning with a short list, usually between 3 and 7 items, of what needs to be effectively completed, reducing the time spent on repetitive decisions on “what to do first”. For profiles with many simultaneous fronts, it is one of the most impactful changes one can adopt.
How to use
- Open Microsoft Planner via Teams or by the task address. office.com.
- In the left side menu, find the “My Day” section, it is usually at the top of the menu above the list of plans.
- Click “My Day”. If this is the first time, the list will be empty.
- To add a new task directly to My Day, use the “+ Add Task” button at the top of the list.
- To bring existing tasks from other plans: click “My Tasks” in the side menu, find the desired task, click on the three points next to it and choose “Add to My Day”.
- Make this selection at the beginning of the day and set between 3 and 7 items as your focus list of the day.
- Throughout the day, keep the “My Day” open as the main reference. Mark the tasks as completed as each one finishes.
- The next day, the list will be automatically cleared, repeat the selection ritual.
9. Share direct links to tasks
Each task of the Planner can be shared through a direct link. This facilitates communication by Teams or e-mail, because the person receives exactly the item he needs to consult, without depending on long explanations or manual navigation by plan.
This feature is useful for billing, quick alignment, comments on specific activities and follow-up of to-dos. Also strengthens tool integration: meeting minutes in Word, messages in Word Teams and emails in Outlook begin to reference tasks from Planner by direct link, keeping a single point of truth about each activity.
How to use
- Open the plan in Planner and find the task you want to share.
- Right click directly on the task within the frame.
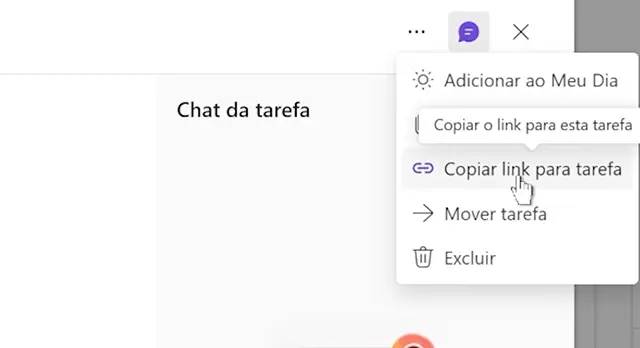
- From the popup menu that appears, select “Copy link to task”.
- Alternatively, open the task by clicking on it, click on the three points in the top right corner of the detail panel and choose “Copy link”.
- The link is automatically copied to the system clipboard.
- Paste the link in Teams chat, in an Outlook email, in a meeting minutes in Word or in any other document where it will be referenced.
- By clicking the link, the recipient will be taken directly to the task panel, respecting the plan permissions, that is, it will only be able to open if it has access to the plan in which the task is.
10. Use task comments to request updates
Each task of the Planner it has a space of own comments that works, in practice, as a chat directly linked to that activity. Every message sent there is registered in the task and fires notifications to the members mentioned with @, provided they are part of the plan.
The strategic use of this feature is for charges and status updates: instead of sending a message in the personal chat or general channel of Teams asking for progress, you comment on the task itself mentioning the responsible. The conversation is recorded exactly where it should be, with the context of the activity, and the history can then be consulted by anyone with access to the plan. This practice reduces the spread of project conversations across different channels and solves the classic problem of “where did we really combine that?”
How to use
- Open the task in which you want to register a charge or update request by clicking on it within the frame.
- Roll to the “Comments” section, which is on the footer of the task detail panel.
- Click on the “Comment” text field to start typing.
- To mention a member of the plan and ensure that he is notified, type “@” and start writing the person’s name. A drop-down list will appear with the members of the plan, click on the desired name.
- Complete the message clearly and objectively, indicating which update you need (e.g. “@Fulano, can you pass me the status of this activity by the end of the afternoon?”.
- Click the “Send” button (paper airplane icon) or press Ctrl+Enter to send the comment.
- The mentioned member will receive notification by email and Teams, with direct link to the task. The conversation is recorded and visible to all members of the plan.
- When the responsible responds, the complete history remains in the task, serving as auditable record of the combined.
11. Export plan to Excel
The Planner allows you to export all the contents of a plan, tasks, buckets, labels, responsible, deadlines and status, to an Excel spreadsheet with a single click. This feature opens the door to more advanced analyses that are not possible within the own Planner: Custom graphics, dynamic tables, crossing with other data sources and dashboard feed on Power BI.
On a day-to-day basis, Excel export is widely used for executive reports, project retrospectives and workload analysis per person. It also serves as a timely backup of the plan, to preserve a snapshot of the situation at a given time, useful for archiving completed projects or for time comparisons between periods.
How to use
- Open the plan you want to export at Planner.
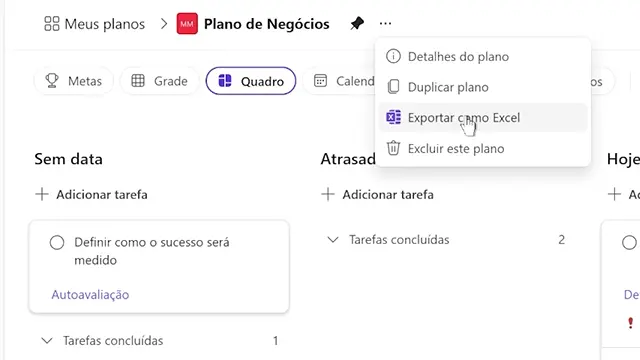
- Locate the three points next to the plan name at the top of the screen (do not confuse with the three individual task points).
- Click on the three points to open the plan options menu.
- Select “Export Plan to Excel” option.
- The browser will start downloading the spreadsheet automatically, the file will have the same name as the plan.
- Open the downloaded file in Microsoft Excel.
- The spreadsheet comes with all relevant information: task name, bucket, responsible, deadline, priority, status, labels, checklist and description.
- Use Excel resources that make sense for your analysis: filters, dynamic table, graphics or formulas.
- If necessary, save the file to a control folder in SharePoint or OneDrive for future query.
12. Move Loop tasks to shared plans
Microsoft Loop has become increasingly present at the meetings of Microsoft 365, especially in shared notes and components embedded in chats and emails. In these contexts, it is very common for tasks to be born within a Loop component in the heat of the meeting, and if they are not relocated, they become visible only to those who participated in that moment.
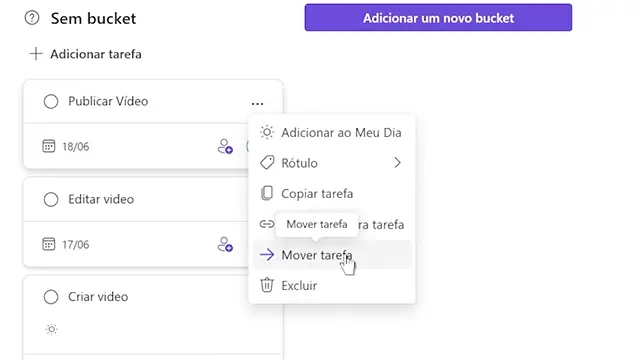
The Planner allows moving these tasks to a shared plan, integrating them into the formal team monitoring flow. Thus, decisions and actions combined in meetings cease to be lost in loose components and become traceable within the team's main task management environment. This solves a silent side effect of the use of Loop components: the proliferation of tasks spread in documents and chats that no one else remembers to follow.
How to use
- Loop component containing the task, it may be within a Teams chat, an Outlook email or a meeting annotation.
- Open the component to view the tasks listed in it.
- Pass the mouse over the specific task you want to move to a shared plan.
- Click the to-do icon or options button (usually three points or menu icon next to it).
- Select the link or move option for Planner (the exact name may vary according to the version: “Move to Planner”, “Add to plan” or similar).
- In the window that opens, choose the shared destination plan, only plans that you are part of will appear.
- If necessary, also choose the bucket within the plan and the task manager.
- Confirm the operation. The task begins to exist within the chosen plan, keeping reference to the original context when applicable (link back to the Loop component).
- From this point on, the task is normally managed within Planner, with all the visibility and monitoring resources of the shared plan.
How to apply these features in everyday life
To begin with, it is worth choosing three or four features and incorporating them into the team routine. For example:
- set Planner to Teams;
- transform messages into tasks;
- use standardized labels;
- follow deadlines by calendar.
These small changes already create more organization and reduce dependence on parallel controls. In project teams, it also makes sense to define a pattern of use: which labels will be used, how status should be updated, when a checklist should become a task and in which situations a task can be moved from one plan to another.
Quick FAQ
-
Do I need Planner Premium to use these features?
Most work on the basic plan. More advanced timeline features, dependencies and AI require Planner Premium. -
Can you create direct task from a Teams message?
Yeah. It is possible to transform the message into task, set responsible, time frame and link to the correct plan. -
How do “My Day” and “My Tasks” help in everyday life?
They focus on the activities coming from various plans and other Microsoft 365 apps in one place. -
Can I export Planner's tasks to Excel?
Yes, for more detailed analytics and custom reports out of the tool.
Continue your journey: recommended articles and videos
You like the contents and you want to go deeper? Check out the complementary materials we prepared:
- Microsoft Planner 2026 news: AI and Project Manager Agent – understand how AI, Project Manager Agent and new protections will transform task and project management in 2026.
- Basic Planner vs Planner Premium: understand the differences – see also this additional demonstration on our channel.
Contact us on the MLPro website

Original content from the MLPro editorial library, fully preserved and translated for the English website.